Monday 20 May 2013

The Panels - Veneering

When the edging was applied it was about 1/32" wider then the panels, this is to allow for flush sanding with the panels.  When this has been completed I was ready to apply the veneer.  For this project the veneer is applied to one side at a time so that the vacuum bag doesn't have the chance to break and splinter and overhanging veneer which would otherwise be on the top surface.  The bottom is veneered, trimmed flush and then the panel is flipped and the top is veneered. 

Pressing the Veneer on bottom of the Panels
On the first round of pressing veneer I made a mistake and formed a few long bubbles in the veneer which needed repair.  The process I used was to moisten and heat the veneer/glue which allows the glue to release and the veneer to be pressed flat manually.  The glue can then bond to the newly flattened veneer. 

A Bubble Ridge in the Veneer in Need of Repair
Paper Towel with Water
Ironing the Papertowel to Add Steam to the Bubble
Using the Iron as a Hot Veneer Hammer to Reactivate and Bond the Glue
Bubble - Before
Bubble - After
The First Panels Veneered on Both Sides are Ready to Go


Pressing the Center Star

After pressing all the veneers I took all the panels over to my friend Dave's house to use his stroke sander.  This quickly surfaced all the panels to 180 grit leaving only to finish sand the veneer surfaces, hand sand the edges and break the edges. While at Dave's he suggested we spread out the parts on the driveway to have a look and see how things will look when completed.  Keeping in mind that there still needs to be a finish sanding done and then lacquer applied we were pretty excited. 

Full Size Table

Full Size Table With Some Gaps to See the Parts Better
Center Star in the Sun

The Panels - Continued


So up until now the panels have all been kept a little oversize.  I lucked out and was able to get a set of templates for the finished dimensions of the parts manufactured on a CNC machine.  


A Single 4x8 sheet of 1/2" MDF held all the Templates
Templates Ready to Go

The templates are attached to the oversize parts using double sided tape.  Once the parts have been matched to the templates they are at their finished dimensions.  However, an allowance for the addition of solid wood edging needed to be made.  The full size parts were profiled with a 1/8" rabbeting bit and then matched to the reduced dimension, this leaves room for 1/8" thick edging. 

Double Sided Tape on the Template
Bearing Bit to allow for Pattern Matching

All the panels Ready to go
A Mountain of Sawdust from the Patten Routing

The edging is added in stages so that one joint can be matched to the next.  The overhang from the first peices is trimmed flush witht he adjoining edge and then the next piece can be added.  Regular masking tape is used to clamp the edging in place.  As it is applied it is stretched to privide pressure. 
 
Center Star with Edging in Progress

A Stack of Partially Edged Components

Not everything always goes as planned, one of the pie wedge components had a portion of the curved edging delaminate.  To fix the problem the old glue was cleaned out of the joint, new glue added and a bar clamp to apply more pressure to make sure it takes hold. 
 
Fixing the Delaminated Edging

Use of a Block to Prevent Marring the Surface


Tuesday 14 May 2013

Expanding Dining Table

So I have been working on a dining table for quite some time now.  Actually, it's been a couple of years.  The project is a radially expanding dining table.  The original concept is credited to Robert Jupe who came up with the idea back in 1835.  

Following are some renderings from the computer model used to develop the parts.  The internal mechanisms for the table are being custom machined. 


The Table When Small
The Table While Expanding
The Table When Large

When small, the table has a diameter of five feet and will seat eight.  Then, after expansion, the table is seven feet diameter and seats twelve.  

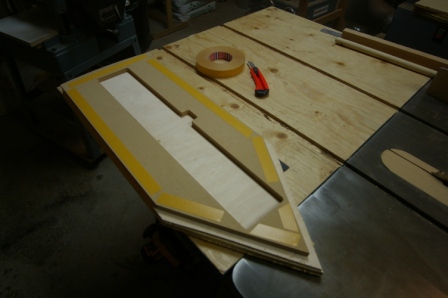
As a starting point for the project I'll begin with the panels.

The table requires six pie shaped wedges, six arrows, and a twelve pointed star in the middle to bring it all together.  The first step was to make rough templates of the parts, the templates were used to make the initial panels.  These panels were made slightly oversize and then trimmed to size based on templates cut out on a CNC machine.  Then edging will be added and veneer pressed on both sides.  


Miter Sled Making the Rough Template

Bandsawing to the line for the Rough Template

The substrate used for the table top components is baltic birch.  It is made up of a lamination of 1/4", 1/2", and then 1/4".  The 1/2" baltic birch has its surface grain oriented the same as the desired orientation for the veneer and the two sheets of 1/4" are orthogonal to that, this is to help ensure the stability of the panels. 

Stack of Parts Ready for Lamination. 

The Components are in the Press, Masking Tape Helps with Alignment


First Set of Lamination Completed

The perimeter of the components is edged with 1/8" thick strips of solid wood.  The edging was made on the table saw / band saw / thicknesser, nothing too special going on there in terms of techniques.  

Solid Lumber Delivery for the Table,   12'6"

1/8" Edge Materials
For the top of the panels a high grade veneer was chosen, the underside of the tabletop will also be veneered with the same species (Bubinga), but with a lower quality. 

Kevazinga Veneer for the Top of the Table


The edges of the veneer needs to be jointed after the initial cutting, this shooting board allows the clamping of multiple sheets of veneer at once to help ensure consistency. 

Shooting Edges on the Veneer
Once the edges of the veneers are jointed on the shooting board the veneers can be arranged as below to create a sunburst pattern.  The pattern below in the photo can be expanded for as many segments as needed, and ensures that a sheet of veneer is no more than two away from the original sesequence.  Then by flipping alternate veneer sheets (the circled numbers) the edges will match up and the sunburst is complete.  


The Pattern Used for the Sequence of Veneer Sheets
Sunburst Pattern for the Center Star