I had a piece of maple with holes in it which I kept considering for some sort of coffee table, but I could never quite think of exactly what to do with it. I decided to just try and show off the wood as best I could and figured a vertical surface would be best for that. Ergo, an interior door!
The maple board needed some serious flattening and after a number of slab flattening projects I have finally come up with a reasonably efficient way of working. After setting the slab on a level surface I now mount a construction laser which projects a horizontal line for me to sight against. Then, I can use a power plane to quickly remove a lot of material. If needed I then use a router on tracks to do a final surfacing and finish with belt, orbital, and hand sanding.
 |
| Flattening the Slab |
Once flattened, I used a grinder, rasps, and sanding to cleanup all the live edges of the board. Due to the slope of the edges, this narrowed the board considerably and made the openings quite a bit bigger.
 |
| Cleaning up the Edges of the Board |
I made a frame for the door out of Honduran Mahogany, the Mahogany was chosen because of the colors and tones it shares with the maple. This was my first time working with Honduran Mahogany and it truly is a joy to work with, it takes machining and hand work exceptionally well and is rich in color. With the frame clamped together I positioning it over the slab which I had purposly kept over size to allow for some adjustment in deciding exactly where and how it would be positioned in the frame.
 |
| Playing with Composition |
Once I had the layout figured I used a guide track and circular saw to cut the panel to size. I did a dry assembly and started to plan out the panels which would infill the holes in the center panel.
 |
| Circular Saw and Guide Track |
 |
| Test Fit with Infill Panels |
The infill panels were used as templates for some sheats. I haven't worked with copper before so there was a bit of a learning curve as to how to work with it. This is by no means a "how to do", it is more of a "how I did".
 |
| Tracing the Needed Shapes on the Copper |
First I tried cutting the copper with a router. This was a bit slow and created a ton of copper shavings. I gave up that technique and moved over to the bandsaw, this worked much better and is definitly how I would work with it in the future.
 |
| Routed Results |
After cutting out the pieces I proceeded to remove the tarnish from the copper with some sanding and polishes. This left the copper with a bright and shiny finish with almost no marks from it's previous life as siding on an old cabin. I then added a mild darkening patina to the copper by wiping on bleach and letting it dry in the air. I also added some creases to the copper by folding and unfolding it with my hands. Then a light sanding removed the patina from the ridges created in the bending process.
 |
| Copper Ready to Glue to the Panels |
After gluing the copper sheets to the plywood panels I used a trim router to bring the copper flush with the plywood. It was a bit slower than a regular veneer but the carbide router bits still got the job done.
 |
| Routed Insert Panels |
 |
| Copper Panels Viewed in a Raking Light |
The shape of the panel inserts meant that only one of them could be inserted into a dado. The other two needed to be placed into rebates in the maple and then into dados in the mahogany frame. I needed to conceal the seam. I tried to conceal it with copper tape, however I'm not 100% satisfied with the result and I think I will have to try and redo it using some came, a traditional beading used on door windows.
 |
| Copper Foil Tape on Rebate Seams |
 |
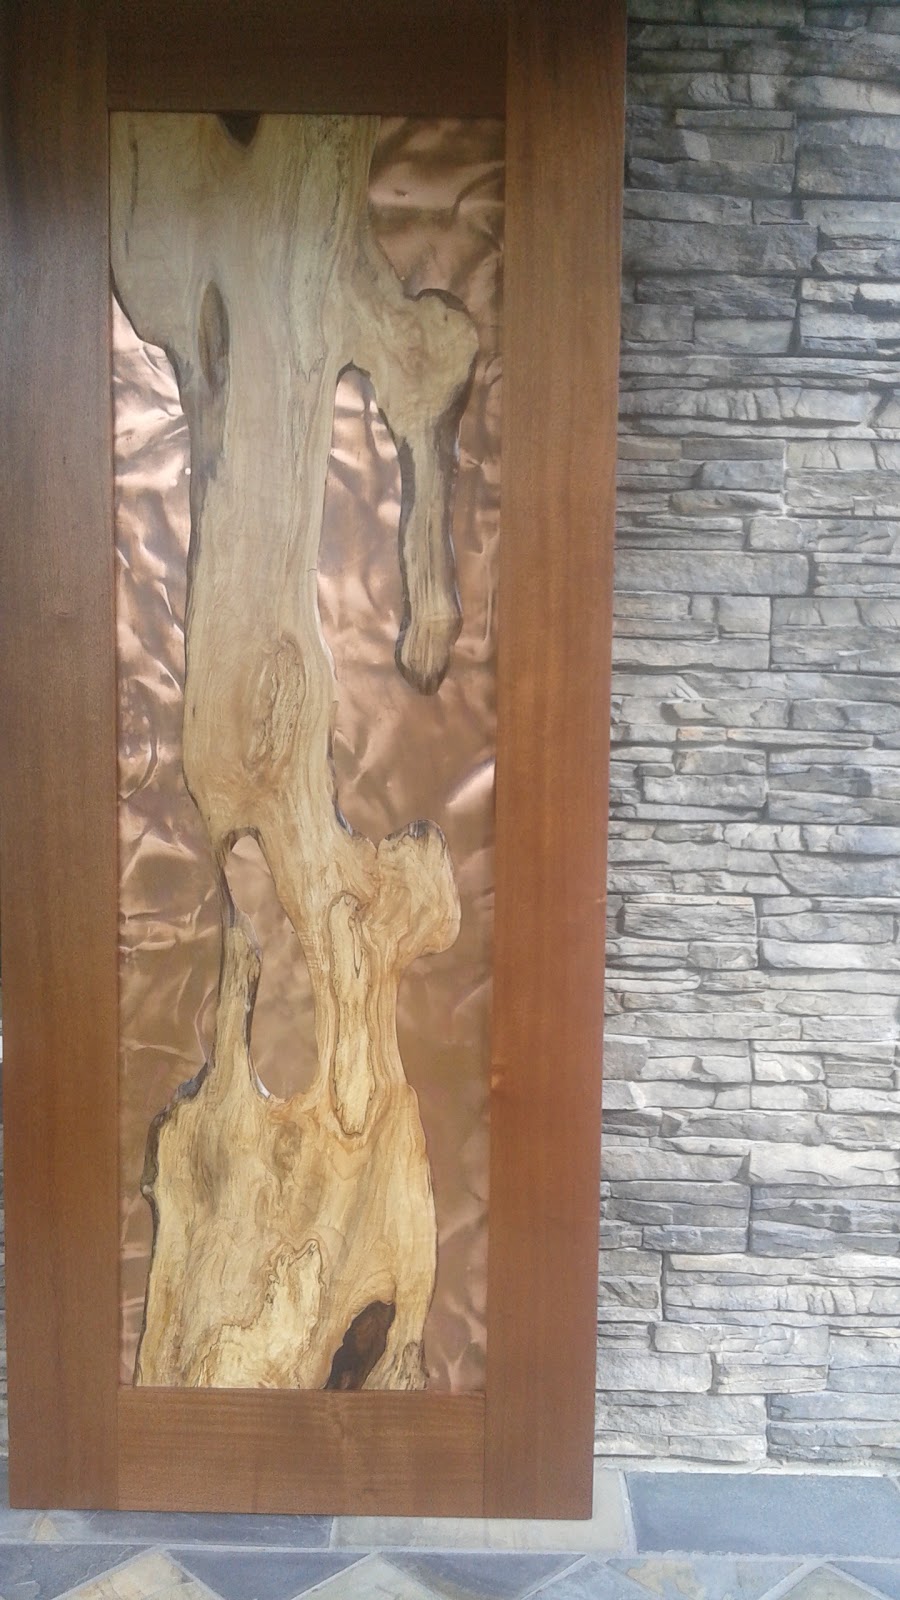
| I Particularly Like the Three Dimensional Quality to the Copper |
This beauty was done as a spec piece as I just had to see the idea through to the end. If anyone knows someone who might be interested in the piece please let me know.
 |
| The Finished Door |