Monday, 20 May 2013

The Panels - Veneering

When the edging was applied it was about 1/32" wider then the panels, this is to allow for flush sanding with the panels.  When this has been completed I was ready to apply the veneer.  For this project the veneer is applied to one side at a time so that the vacuum bag doesn't have the chance to break and splinter and overhanging veneer which would otherwise be on the top surface.  The bottom is veneered, trimmed flush and then the panel is flipped and the top is veneered. 

Pressing the Veneer on bottom of the Panels
On the first round of pressing veneer I made a mistake and formed a few long bubbles in the veneer which needed repair.  The process I used was to moisten and heat the veneer/glue which allows the glue to release and the veneer to be pressed flat manually.  The glue can then bond to the newly flattened veneer. 

A Bubble Ridge in the Veneer in Need of Repair
Paper Towel with Water
Ironing the Papertowel to Add Steam to the Bubble
Using the Iron as a Hot Veneer Hammer to Reactivate and Bond the Glue
Bubble - Before
Bubble - After
The First Panels Veneered on Both Sides are Ready to Go


Pressing the Center Star

After pressing all the veneers I took all the panels over to my friend Dave's house to use his stroke sander.  This quickly surfaced all the panels to 180 grit leaving only to finish sand the veneer surfaces, hand sand the edges and break the edges. While at Dave's he suggested we spread out the parts on the driveway to have a look and see how things will look when completed.  Keeping in mind that there still needs to be a finish sanding done and then lacquer applied we were pretty excited. 

Full Size Table

Full Size Table With Some Gaps to See the Parts Better
Center Star in the Sun

The Panels - Continued


So up until now the panels have all been kept a little oversize.  I lucked out and was able to get a set of templates for the finished dimensions of the parts manufactured on a CNC machine.  


A Single 4x8 sheet of 1/2" MDF held all the Templates
Templates Ready to Go

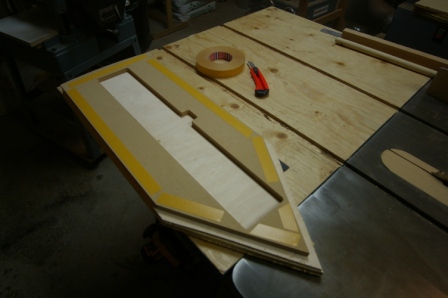
The templates are attached to the oversize parts using double sided tape.  Once the parts have been matched to the templates they are at their finished dimensions.  However, an allowance for the addition of solid wood edging needed to be made.  The full size parts were profiled with a 1/8" rabbeting bit and then matched to the reduced dimension, this leaves room for 1/8" thick edging. 

Double Sided Tape on the Template
Bearing Bit to allow for Pattern Matching

All the panels Ready to go
A Mountain of Sawdust from the Patten Routing

The edging is added in stages so that one joint can be matched to the next.  The overhang from the first peices is trimmed flush witht he adjoining edge and then the next piece can be added.  Regular masking tape is used to clamp the edging in place.  As it is applied it is stretched to privide pressure. 
 
Center Star with Edging in Progress

A Stack of Partially Edged Components

Not everything always goes as planned, one of the pie wedge components had a portion of the curved edging delaminate.  To fix the problem the old glue was cleaned out of the joint, new glue added and a bar clamp to apply more pressure to make sure it takes hold. 
 
Fixing the Delaminated Edging

Use of a Block to Prevent Marring the Surface


Tuesday, 14 May 2013

Expanding Dining Table

So I have been working on a dining table for quite some time now.  Actually, it's been a couple of years.  The project is a radially expanding dining table.  The original concept is credited to Robert Jupe who came up with the idea back in 1835.  

Following are some renderings from the computer model used to develop the parts.  The internal mechanisms for the table are being custom machined. 


The Table When Small
The Table While Expanding
The Table When Large

When small, the table has a diameter of five feet and will seat eight.  Then, after expansion, the table is seven feet diameter and seats twelve.  

As a starting point for the project I'll begin with the panels.

The table requires six pie shaped wedges, six arrows, and a twelve pointed star in the middle to bring it all together.  The first step was to make rough templates of the parts, the templates were used to make the initial panels.  These panels were made slightly oversize and then trimmed to size based on templates cut out on a CNC machine.  Then edging will be added and veneer pressed on both sides.  


Miter Sled Making the Rough Template

Bandsawing to the line for the Rough Template

The substrate used for the table top components is baltic birch.  It is made up of a lamination of 1/4", 1/2", and then 1/4".  The 1/2" baltic birch has its surface grain oriented the same as the desired orientation for the veneer and the two sheets of 1/4" are orthogonal to that, this is to help ensure the stability of the panels. 

Stack of Parts Ready for Lamination. 

The Components are in the Press, Masking Tape Helps with Alignment


First Set of Lamination Completed

The perimeter of the components is edged with 1/8" thick strips of solid wood.  The edging was made on the table saw / band saw / thicknesser, nothing too special going on there in terms of techniques.  

Solid Lumber Delivery for the Table,   12'6"

1/8" Edge Materials
For the top of the panels a high grade veneer was chosen, the underside of the tabletop will also be veneered with the same species (Bubinga), but with a lower quality. 

Kevazinga Veneer for the Top of the Table


The edges of the veneer needs to be jointed after the initial cutting, this shooting board allows the clamping of multiple sheets of veneer at once to help ensure consistency. 

Shooting Edges on the Veneer
Once the edges of the veneers are jointed on the shooting board the veneers can be arranged as below to create a sunburst pattern.  The pattern below in the photo can be expanded for as many segments as needed, and ensures that a sheet of veneer is no more than two away from the original sesequence.  Then by flipping alternate veneer sheets (the circled numbers) the edges will match up and the sunburst is complete.  


The Pattern Used for the Sequence of Veneer Sheets
Sunburst Pattern for the Center Star

Sunday, 14 April 2013

Meet The Press


The blog has been a little quiet lately, I've been keeping busy with the last details of the chair and desk set and should have some final photos ready soon. I've also been getting geared up for the next big project. Which of course necessitates a few smaller prepatory projects. This upcoming project will require a lot of veneer work and panel pressing. Though I do have a couple friends on whom I could lean to borrow their presses I started to do the math on just how many trips to their shops this would be and how much of their time I would really be asking for and decided it best to invest in a press of my own. A vacuum press is a great tool for any wide panel work. What would require many many clamps and weights can be simply put into a large bag which is sealed shut and has the air sucked out of it.

The first step in setting up the press is to get a large flat surface to work on.  I decided to build a torsion box out of plywood and mount it to the wall with hinges.  The torsion box has a 3/4" thick bottom, 3/4" grid of support inside, and a 1/2" thick top.  The grid was made of 3" wide strips of plywood on edge to give the box the rigidity it requires.  The bottom is a little thicker to allow for screws for mounting some light weight storage on the underside. 

Torsion Box Grid
 The box itself went together quite quickly using about 300 screws. 

Finished Working Surface of the Torsion Box
Of course the torsion box is just the first step in getting the vacuum press running.  The box itself was mounted to the wall on some door hinges and a couple of collapsible legs with adjustable height feet were added to keep it level while in use.  On top of the torsion box is where the bag of the press will reside and inside it there needs to be a platen.  The bottom platen was made out of 3/4" melamine laminate.  The board had a series of channels cut into it to allow for the evacuation of air.  When in use any object that goes into the press needs to rest over top of these. 


Melamine Platen Which Goes Inside the Vacuum Bag
When in use there also needs to be a way on top of the workpieces for the air to be evacuated.  Rather than make another platten which would be a little unwieldy we can use a breather mesh which has channels allowing the air to escape.  The Vacuum hose needs to attach above this mesh and the mesh also needs to cover the workpeices.  This will create a series channels allowing the air to escape throughout the bag which is what gives us the even pressure we need for effective pannel assemblies. 

When an effective vacuum has been reached the pump continues to run and a bleeder valve is adjusted to maintain consistent pressure for the duration of the lamination.  The pressure achieved is somewhere in the ball park of 11psi.    


The Press Being Put to Work for the First Time
On the Friday of the weekend when I was to build the press a good friend at work asked what the plans for the weekend were.  She knows that I'm a woodworker and that most of my weekend plans revolve around wood in some way, so I told her about the project.  She then asked if this stuff was like porn for me.  We both got a laugh and I told her no, though in hindsight, maybe it is.  

If there is one thing that keeps me up at night, that I scour the internet for on a regular basis, and have magazines arriving monthly at my house for, it is woodworking.   

Tuesday, 5 March 2013

Building a New House

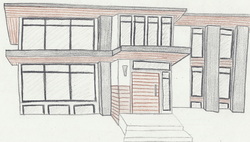
Back in December a friend of mine, Calley Erickson, approached me about partnering to build a house in Bowness, the neighborhood where we both live.  We met and talked about it a number of times and I am very happy to say that we are moving ahead with the project and will be building over the summer.  We are currently working on building our construction estimate and clarifying our vision for the project.  Calley's wife Carrie is a gifted artist, below is her rendering of the front of the house.  

The Front of the House
I am excited about many of the parts of the house which I will get to work on.  This past week I have started researching how I will approach building a spiral staircase with an open central column, custom front entry door, and the kitchen and built-ins throughout the house.  

We have the a lot of work ahead of us and are excited to be moving forward.  If anyone is interested in being involved in or investing in the project I have attached our one page overview sheet below. 


One Page Overview
 

SAWS Timber Framing Presentation


On February 20th I gave a presentation on timber frame construction and in particular center line layout techniques. As promised, here is the power point presentation I used in the first half of the presentation.


Sunday, 3 March 2013

Tree Table and Chair

Progress on the chair and desk has seemed a little slow lately, this is largely because so much sanding and shaping was required on the carvings of the trees for the table.  The carved trees wrap around the entire perimeter of the table, there are 7 on the front and back and 3 on each side.  Totaling 20 trees on the table which required enough time that I could have watched the Lord of the Rings trilogy three times though.  There really wasn't much to explain in it other than it just takes lots of sand paper and sore fingers. 

Quite a bit of time also went into finessing the fit of the chair back to the legs.  It was secured with 1/4" steel rod which extends 5" into the legs and 1 3/4" into the chair back.  I've given the chair a good test sit with a slight lean and all seems to be well thus far. 

Table and Chair together for the First Time
Closeup of the Carved Trees

Once the final sanding and looking over of the chair and desk was completed I took the pieces over to the spray booth were I have applied a lacquer.  This was my first time to use a spray finish and while I have been taking my time I seem to be getting acceptable results.  I can't offer any tips and tricks as I am still learning how to do it.  I'd say thus far that it is coming out good, but not great.  Still have much to learn. 

The Chair in the Spray Booth

Hopefully, I will be able to  make the slip seat for this chair shortly and then put this project to bed.