Tuesday, 5 March 2013

Building a New House

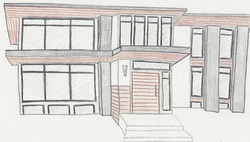
Back in December a friend of mine, Calley Erickson, approached me about partnering to build a house in Bowness, the neighborhood where we both live.  We met and talked about it a number of times and I am very happy to say that we are moving ahead with the project and will be building over the summer.  We are currently working on building our construction estimate and clarifying our vision for the project.  Calley's wife Carrie is a gifted artist, below is her rendering of the front of the house.  

The Front of the House
I am excited about many of the parts of the house which I will get to work on.  This past week I have started researching how I will approach building a spiral staircase with an open central column, custom front entry door, and the kitchen and built-ins throughout the house.  

We have the a lot of work ahead of us and are excited to be moving forward.  If anyone is interested in being involved in or investing in the project I have attached our one page overview sheet below. 


One Page Overview
 

SAWS Timber Framing Presentation


On February 20th I gave a presentation on timber frame construction and in particular center line layout techniques. As promised, here is the power point presentation I used in the first half of the presentation.


Sunday, 3 March 2013

Tree Table and Chair

Progress on the chair and desk has seemed a little slow lately, this is largely because so much sanding and shaping was required on the carvings of the trees for the table.  The carved trees wrap around the entire perimeter of the table, there are 7 on the front and back and 3 on each side.  Totaling 20 trees on the table which required enough time that I could have watched the Lord of the Rings trilogy three times though.  There really wasn't much to explain in it other than it just takes lots of sand paper and sore fingers. 

Quite a bit of time also went into finessing the fit of the chair back to the legs.  It was secured with 1/4" steel rod which extends 5" into the legs and 1 3/4" into the chair back.  I've given the chair a good test sit with a slight lean and all seems to be well thus far. 

Table and Chair together for the First Time
Closeup of the Carved Trees

Once the final sanding and looking over of the chair and desk was completed I took the pieces over to the spray booth were I have applied a lacquer.  This was my first time to use a spray finish and while I have been taking my time I seem to be getting acceptable results.  I can't offer any tips and tricks as I am still learning how to do it.  I'd say thus far that it is coming out good, but not great.  Still have much to learn. 

The Chair in the Spray Booth

Hopefully, I will be able to  make the slip seat for this chair shortly and then put this project to bed.

Tuesday, 5 February 2013

The Chair Back Continued - Some More

I left off last time with the three bent laminations completed and the tree inset carved and ready.  The next step is to join these components together.  To help with alignment during glue up some 1/4" dowels will be placed in the joints between the bent laminations.  An initial set of holes are drilled on the edge of one lamination and then the locations are transferred to the adjacent lamination using some dowel center finders.  I used to use a piece of dowel sharpened in a pencil sharpener....... this is waaaay better, definitely worth the $4.  

Dowel Center Finders in the Middle Lamination
All Three Laminations Doweled and Aligned for Glue Up
The middle lamination will have the center 3.5 inches removed for the insertion of the carved tree.  Once center is found on both items the cutout section can be marked and cut out. 

Aligned for Cutout
The Portion to be Removed and the Angles of the Cuts
The cuts are made using a crosscut sled on the table saw.  The crosscut sled allows for the use of blocks to support the lamination at the required angle and also for the very precise side to side adjustment using screw blocks. 
Aligning the Cut to the Blade of the Saw
Once the waste has been removed from the middle lamination alignment slots are cut along the center of the two halves and the walnut insert.  Using a couple of splines the carved tree will be aligned within the center of the seat back. 


Alignment Slots for the Tree Insert
Dry Assembly - Note the Color in the Canary Wood
Once glued up the walnut insert is shaved flush to the seat back using rasps and sand paper

Leveling the Insert
With a leveled insert the seat back is ready to be shaped.  The edges of the back all have curved edges.  The curved profile of all four edges is the same, so to ensure consistency a model form was made from mdf was copied to the seat back using a template bit in a router table.  This gives the final shape of the seat.  Finally a thumbnail edge profile was applied to the backside of the seat back. 


Seat Back Profiled
As Seen from the Back - Final Sanding Still Needed
Of course while working on the seat back I have been working on all the other components of the chair.  
Dry Assembled - Front View
Dry Assembled - Rear View
Dry Assembled - Seat Back
Now its time for some final sanding and shaping, glue up, corner blocks, and making a slip seat.  So far I'm pretty happy with the look of the chair.  This is the first time I've done one that had compound joinery and it has been a really good experience to work through the problems thus far.  To any woodworkers out there who are trepidatious about building a chair because of the complications in joinery I have to say just go for it.  It was really satisfying and enjoyable. 


Tuesday, 22 January 2013

The Chair Back Continued

Once each of the three bent laminations was ready and removed from the form the edges were jointed and then ripped to width to make them paralel.  This allows for a more accurate cleanup of the glue and which then allows for another round of jointing and ripping on the table saw.  This is done taking off as  little as possible.  Once done each of the three peices looks pretty much like this. 

One bent lamination jointed and ripped, ready for joining. 
With the three of them done I was able to mix and match for the best grain alignment and cleanest of joints.  Even though the form to make these was itself made form only one half of the curve there was a minor difference side to side which defined each of the three laminations with a definite left and right side .  Imperceptible to the touch of the back but a misalignment of 1/16th of an inch glares out when looking at curves that run parallel. 

All three bent laminations standing on top of each
other in their eventual configuration. 
When ripping the final width of the center lamination I also ripped the width and height of the insert square that will the the detail inthe centre of the chair back.  This is cut from a solid block of walnut which is thicker than the rest fo the parts to allow for final fitting when completed.  The imterior thickness of the block was reduced using a router so that only the middle 1/4 inch remained.  Then, pilot holes were drilled in the empty space and the outline of the tree was cut out with a fret saw. 

Rough shape after the fret saw. 
After roughing out the shape the edges and profiles were broken and refined with a set of small files.  This peice is almost finished and took quite a while to do but I think the results will be worth it when all is said and done. 

After refining with some small files. 


Tuesday, 15 January 2013

The Tree Table

So I have just started to work on a new project, it is a writing desk and chair set.  The set will be made of Canary wood and Walnut.  I have jumped right into this project and have many components in the works so I will just pick a few of the more interesting ones to write about. 

To give an idea of what I will be working towards here is a snapshot from sketchup of the piece and some of the parts cut to rough length. 

Sketchup Model

Note the beautiful grain and color in the quarter sawn canary wood.


The back of the seat will be built using a bent lamination process on the canary wood to create three 3.5" wide curved strips.  The middle strip will be cut apart to allow for the insertion of a block of walnut with a piercing of a tree inset within it.   

 First step was to build the bending form.  The desired width of the seat back is 17", I built the form 20" wide to allow for trimming.  The curve was drawn out on one peice of 1/2" MDF which was roughed out on the bandsaw.  The curve was then faired using a rasp and file untill both sides matched.  Once the first layer of MDF was accurate layers were added to each side and trimmed flush at the router table.  Eight layers were used to create a bending form 4" thick, just wide enough to bend the components for the seat.  

Using a bearing bit to flush trim the MDF form.

Once the form was ready and the plies of canary wood had been thickness planed to 1/8" they were covered with glue and clamped to the form.  A common problem with bending wood is spring back.  Regular carpenter's glue is used, and though in most applications an hour is sufficient, in bending to curves there are additional forces at work.  When a drop of glue sits out for an hour it may be dry to the touch but it can still be deformed with pressure and is not fully hardened.  However, if allowed to stay out for a full day the glue is considerably harder.  It will chip rather then bend or deform.  Using this logic my friend Dave always recommends leaving a curve in the form for a full day and then keeping pressure on the curve to help the glue fully harden in the proper form.  I am letting these three laminations sit in the form for two full days to be extra sure.  As they will need to be joined edge to edge I am trying to ensure they stay as consistent as possible. 

The form in use, bending six 1/8" plys.

Note the full width blocks to ensure equal pressure across the width of the curve.

New Members in the Chisel Family


So it has been a little while since I posted anything.  After the timber framing course things were pretty hectic through Christmas and afterwards.  A bunch of my family chipped in and gave me a pair of timber framing chisels for Christmas which is really exciting. 

I've been anxiously waiting their arrival, each day checking the status of their delivery on the USPS website.  My friend Jamie said it reminded of him of the Calvin and Hobbes comic strip where Calvin orders a propeller beanie in the mail and it takes 6 weeks to arrive.  It's worth checking because it is actually quite accurate.  

ch890304.jpg

Today they finally arrived!!!  Thanks to my generous family I now have 1.5" and 2" Barr Quarton timber framing chisels in my arsenal.


The New Chisels, 1.5" on the left, 2" on the right


The Quartons measure 17.5" long but are no match for the Smith original that my brother made for me for Christmas.  The Smith original is 6" in width and has a new home on the wall in the shop where I will see it every day.  Thanks bro for one of the coolest Christmas presents ever!!! 


The Smith Original in its New Home
A small addendum on setting up the new chisels; To truly make a chisel sharp both the back and bevel need to be sharpened to a high degree.  The edge can only be as good as the worse of the two planes which intersect.  As a result when I get a new chisel I try to take the time to flatten the back, which, luckily only needs to be done once.  Often this means putting on a movie and lapping the back of a set of small chisels in an evening.  However, these chisels are much larger than my others and thus I knew it would take longer.  How much longer was a mystery I was going to have to find out the long way.  Over the past week I have had a couple of late nights and watched more movies than I normally care to.  It turns out I could have almost watched the entire Lord of the Rings trilogy (extended edition) in the time it took to fully lap the backs of these beauties.  I wound up putting a little more that five hours into each one. 
 
Before lapping the back.
The slurry produced in a few hours of lapping.
After lapping the back.