Tuesday, 4 November 2014

Board Butter

A while back I made a workshop resolution to burn less.  I wanted to make better use of my offcuts and as much as I enjoy roasting sausages over the fire I always feel a little guilty about it when I'm cooking those smokies over Walnut and Bubinga; Spruce works just as well. 

This of course means that I need to come up with ideas for small projects which don't take up much time.  Long live the cutting board / serving tray!  I've had a few other ideas come to mind but realistically this is one of the easiest as all I need to to is keep piling up the offcuts in a bucket and when the bucket is full its time to mix and match until something comes together.

With a pile of cutting boards siting in the shop waiting for a finish I decided to do it right and make up a batch of "Board Butter", which is a mixture of mineral oil and beeswax. 


Really Simple Ingredients

I filled up a jar with mineral oil to the 400ml mark and then added chips of beeswax until it measured 500ml giving me a 4 to 1 mix. 

The Mix Ready for Heating

I heated up the mix in a small pot on the stove until the wax had completely melted and then poured the mix into a wide mouth mason jar and set it to cool on the counter. 


The Mix on the Stove

Fresh From the Stove

Cooled and Ready to Use

The Board Butter is relatively similar to peanut butter in consistency and is applied with a cloth.  It then sits for a couple of minutes before being buffed to a fine luster.  


Half Waxed

Boards Waxed and Ready to Use

Sunday, 14 September 2014

Big Wood

On the return trip from the West Coast I stopped in to visit my wood guy.  Yes, I have a wood guy.  His name is Andy and he’s been a lumberjack in the lower Fraser Valley for most of his life.  In that time he has accumulated a couple barn-fulls of wood.  And when I say barn full I mean that in the most literal sense possible.  The man has stacks of wood up to and in the rafters of a couple of barns.  While there I looked at a few boards and saw lots of nice wood which would have been great to take home, but there is only room for so much. 
At the end of the day I decided to bring back one large board.  It is a beauty of a board; a large Maple with some curled and quilted figure.  It also has moderate spalting which is an absolute dream for me.  The twisty black lines which come from spalting are a favorite feature of mine and I treasure even the tiniest pieces which exhibit it. 
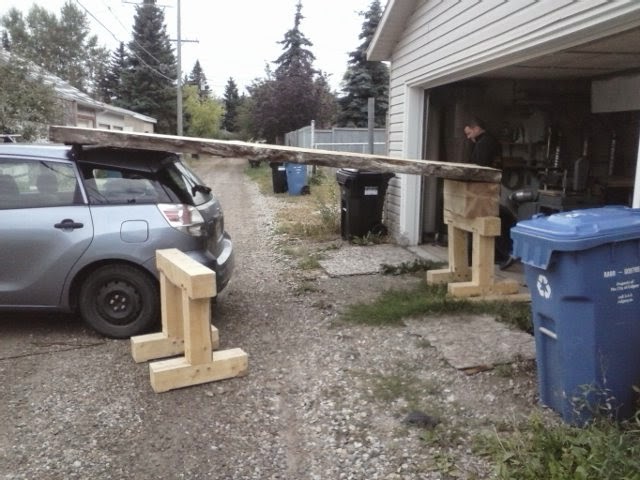
The word board is a bit of an understatement, the board would really be best described as a slab.  Even the word slab doesn’t do this piece justice; it should really be called a large slab.  This piece of wood is magnificent, it ranges in width from 40" to 44" as the live edges wanders; and it is 12’ long. 


Andy Bringing the Slab out of Storage

Loading the Car

Unloading the Slab with my Neighbor Jeff, Thank Goodness he was Home
I envision making a dining or board room table from this beauty.  As of yet it is unspoken for; if you’re interested in it or know someone who is please drop me a line. 

Waiting in the Shop

Tuesday, 2 September 2014

Pemberton - Revisted

Last week I went out to the west coast for some sailing with friends.  On the way there we took the long way around and I took the opportunity to check in on the timber frame barn in Pemberton on which I worked earlier this year.  It was really neat to see the finished building with the roofing installed and the finish applied.  


The Big Open Spans Really do Make for a Spacious Building

One of the Pieces I Worked on Hard at Work.

I'm in the Fine Print Down there Somewhere


The Finished Barn

Friday, 15 August 2014

Offcuts

Recently, I've been working on some non-woodworking related tasks.  A bit of photography, and a bit of website remodeling.  Of course these are not really my strong suits so I had to lean on a couple friends for some help.  Without Jeremy and Erik the quality and actual presence of content on the site would really suffer, I am very grateful to have such helpful friends.  

I've updated the gallery to include a couple recent projects and added a new section called offcuts.  Offcuts is a place to make use of some of the smaller pieces of wood leftover from other work and try to keep them out of the fire pit and in people's homes.  

Friday, 1 August 2014

Maloof Rocker - Finally Finished!

I've been puttering along on the Maloof rocker as I've been working on some other projects lately and it is finally finished.  The last Post left off with the attachment of the rockers.  Since then I've shaped and faired the rockers at both ends and where they attach to the front and rear legs.  This was a pretty satisfying step as it really completed the final look of the rockers and tied them into the rest of the chair.  

Closeup of the Ends of the Rockers

Closeup of the Rear Leg to Rocker Joint

Closeup of the Front Leg to Rocker Joint


Upon completion of this I went over the chair and sanded out any scratches I could find and brought the chair from crest rail to rockers through 180, 220, and 320 grit.  This was a very tedious process as there are so many surfaces which had to be gone over and it is all done by hand.  That being said the slow and meticulous nature of the work is alright.  This project has taken a long time and bringing it to completion was quite nice.  
I rubbed down the entire chair with a microfiber cloth to remove all possible dust from the pores of the wood and clean it up as much as possible before finishing.  

I decided to apply Sam's traditional finishing technique to the chair.  I have not used this finishing process before but here it is.

There are two stages to the finish.

The first stage uses a mix of

1/3 Boiled Linseed Oil
1/3 Pure Tung Oil
1/3 Oil Based Varnish

Mix for Phase One

The second stage uses a mix of
1/2 Boiled Linseed Oil
1/2 Pure Tung Oil
Bees Wax to bring the mixture to the consistency of heavy cream.

Of course that recipe doesn't really say just how much bees wax that means.  So I measured the mix before and after the wax and did a little math.  Here's what I ended up using.  

7 parts Boiled Linseed Oil
7 parts Pure Tung Oil
2 parts Bees Wax

Mix for Phase Two
I shaved the beeswax using a carrot peeler and as this took quite a while to make progress tried making small chunks with a knife.  This seems to melt into the oil just as well.  I heated the mixture in a mason jar in the microwave on low for a minute at a time.  After three minutes the wax was completely melted into the oil and I just had to wait for the mixture to cool. 

Turns Out Small Chunks Cut With a Knife Work Well Too

Melting the Beeswax Into the Oil


The Cooled Wax Has a Tendency to Separate, a Quick Shake Solves the Problem


The first mix is applied by wiping it on liberally and covering the entire chair, waiting a couple minutes and then wiping off the excess.  This is done once a day for 4 days.  The second mix is applied using the same technique and is done once a day for 2 days.


Partway Through Applying the First Coat of Finish

Partway Through Applying the First Coat of Finish


After Applying the Third Coat

After Wiping Off the Excess of the Third Coat

Going forwards I think I will change the finishing process.  I would finish it with the first wiping mixture, completing 4 or 5 coats, and omit the second mixture (I found it quite sloppy) in favor of applying a simple paste wax or beeswax.  
The way I see it, the first mix is an application of oil and varnish; simplifying a bit, the oil seeps into the wood and the varnish builds on the surface.  After a few coats of this I am unsure how effectively the oil was still passing through the varnish and wonder how much of it I was just wiping off.  There was an accumulation of waxy residue from the second mix which I buffed to a smooth finish.  

After applying finish daily for a week I was anxious to get the chair out of the shop and have a sit; thankfully it is quite comfortable!  Following are a few shots of the rocker's first day out in the sun. 


Wednesday, 30 July 2014

Tool Chest - Hardware

My hardware choice for handles on this chest will match the other existing chest, I used black cast iron handles from Lee Valley.  The only downside with this hardware is that it comes with mounting screws which are far too long for my use.  I haven’t put the handles onto a chest with sides which are 1.25” thick yet so I always have to shorten the screws by 3/8” to 1/2". 

Marking the Centerpoints for the Handle Mounting Screws

Mounting Screws in Need of a Trim

Side Handles Test Fit


After reattaching the drawer fronts I installed the drawer pulls.  I used ring pulls to match the other component which has already been built.  I drilled a hole a little larger than the width of the prongs but a little smaller than the diagonal.  This keeps the pulls from moving around too much during installation and avoids slop in the fitting.  I bent the tines back with an old ruler and a pair of needle nose pliers and clinched them into the back of the drawer front with a small hammer. 


Drill Bit Slightly Under Diagonal Measurement of Tines

Tine Bent and Ready to be Hammered into Place


If the ring pull needs to be installed to close to the top of the drawer to allow both tines to spread out normally the top one is twisted 90 degrees.  I have tried cutting the tine short in the past and this is a much better option.  

Installation in Tall Drawers

Installation in Short Drawers


With all the hardware installed and the drawers replaced the chest is done and ready to be loaded with tools.


Left Side

Right Side
  
Back
 
The New Chest Component Ready for Pairing

The Pre-existing Cabinet Component

Paired up and Ready to Work